Cobbler部署及使用
作者:快盘下载 人气:Cobbler
文章目录
Cobblercobbler简介工作原理 部署;下面使用自动部署cobbler简介
Cobbler 可以用来快速建立 Linux 网络安装环境;它已将Linux网络安装的技术门槛;从大专以上文化水平;成功降低到了初中水平;连补鞋匠都能学会。
网络安装服务器套件Cobbler;补鞋匠;从前;我们一直在装机民工这份很有前途的职业。自打若干年前Red Hat推出了 Kickstart;此后我们顿觉身价增倍。不再需要刻了光盘一台一台的安装Linux;只要搞定PXE、DHCP、TFTP;还有那满屏眼花缭乱不知所云的Kickstart脚本;我们就可以像哈利波特一样;轻点魔棒;瞬间安装上百台服务器。这一堆花里胡哨的东西可不是一般人能够整明白的;没有大专以上的学历;通不过英语四级;根本别想玩转。总而言之;这是一份多么有前途;多么有技术含量的工作啊。很不幸;Red Hat 最新;Cobbler项目最初在2008年左右发布;发布了网络安装服务器套件Cobbler;补鞋匠;;它已将Linux网络安装的技术门槛;从大专以上文化水平;成功降低到初中以下水平;连补鞋匠都能学会。
1、Cobbler是一个Linux服务器安装的服务;可以通过网络启动;PXE;的方式来快速安装、重装物理服务器和虚拟机;同时还可以管理DHCP;DNS等。
2、Cobbler可以使用命令行方式管理;也提供了基于Web的界面管理工具;cobbler-web;;还提供了API接口;可以方便二次开发使用。
3、Cobbler是较早前的kickstart的升级版;优点是比较容易配置;还自带web界面比较易于管理。
4、Cobbler内置了一个轻量级配置管理系统;但它也支持和其它配置管理系统集成;如Puppet。
工作原理

首先需要在server端部署cobbler;
启动cobbler后执行cobbler check命令检查
进行配置同步;执行cobbler sync命令
复制相关启动文件到TFTP目录中
启动DHCP服务分配ip给client端
client端通过server端传过来的启动文件启动
此时client端选择安装来确定安装信息
client端想server端发送安装信息
server端接到client端的安装信息后向client端发送安装文件
部署;
配置yum源
curl -o /etc/yum.repos.d/CentOS-Base.repo https://mirrors.aliyun.com/repo/Centos-vault-8.5.2111.repo

yum install -y https://mirrors.aliyun.com/epel/epel-release-latest-8.noarch.rpm

sed -i ;s|^#baseurl=https://download.example/pub|baseurl=https://mirrors.aliyun.com|; /etc/yum.repos.d/epel*
sed -i ;s|^metalink|#metalink|; /etc/yum.repos.d/epel*
安装相关软件:
[root;localhost ~]# dnf module enable cobbler:3 -y
#打开cobbler:3模块

[root;localhost ~]# yum install -y httpd dhcp* tftp tftp-server rsync rsync-daemon cobbler cobbler-web

启用相关服务:
[root;localhost ~]#  systemctl restart httpd.service
[root;localhost ~]# systemctl restart tftp
[root;localhost ~]# systemctl restart cobblerd.service
[root;localhost ~]# systemctl restart rsyncd

[root;localhost ~]#  systemctl enable httpd.service
[root;localhost ~]# systemctl enable tftp
Created symlink /etc/systemd/system/sockets.target.wants/tftp.socket → /usr/lib/systemd/system/tftp.socket.
[root;localhost ~]# systemctl enable cobblerd.service
Created symlink /etc/systemd/system/multi-user.target.wants/cobblerd.service → /usr/lib/systemd/system/cobblerd.service.
[root;localhost ~]# systemctl enable rsyncd
Created symlink /etc/systemd/system/multi-user.target.wants/rsyncd.service → /usr/lib/systemd/system/rsyncd.service.
[root;localhost ~]# systemctl stop firewalld.service
[root;localhost ~]# systemctl diasbel firewalld
Unknown operation diasbel.
[root;localhost ~]# setenforce 0
[root;localhost ~]#
server 端配置:
#生成密码
[root;localhost ~]# openssl passwd -1 -salt ;$RANDOM; ;123.com;
$1$22681$7RqxvgmKIIRsGpOiTiP0e0
#改配置文件
[root;localhost ~]# sed -i ;s/^server: 127.0.0.1/server: 192.168.245.131/; /etc/cobbler/settings.yaml
[root;localhost ~]# sed -i ;s/^next_server: 127.0.0.1/next_server: 192.168.245.131/; /etc/cobbler/settings.yaml
[root;localhost ~]# sed -i ;s/^default_password_crypted.*/default_password_crypted: ;$1$22681$7RqxvgmKIIRsGpOiTiP0e0; /etc/cobbler/settings.yaml
[root;localhost ~]# sed -n ;/^default_password_crypted.*/ p; /etc/cobbler/settings.yaml
default_password_crypted: ;$1$22681$7RqxvgmKIIRsGpOiTiP0e0;
#打开dhcp功能
[root;localhost ~]# sed -i ;s/^man.*dhcp:.*/manage_dhcp: true/; /etc/cobbler/settings.yaml
[root;localhost ~]# sed -n ;/^manage.*dhcp.*/ p; /etc/cobbler/settings.yaml
manage_dhcp: true
[root;localhost loaders]# yum -y install syslinux*
[root;localhost loaders]# cp /usr/share/syslinux/pxelinux.0 /var/lib/cobbler/loaders/
[root;localhost loaders]# cp /usr/share/syslinux/menu.c32 /var/lib/cobbler/loaders/
[root;localhost loaders]# ls /var/lib/cobbler/loaders/
menu.c32 pxelinux.0
[root;localhost loaders]# yum -y install yum-utils
[root;localhost etc]# cobbler check
#通过检查排除问题;一个个来。不会或者看不懂就看看翻译
##subnet 后使网段
[root;localhost etc]# vim /etc/cobbler/dhcp.template
subnet 192.168.245.0 netmask 255.255.255.0 {
option routers 192.168.245.2; #网关
option domain-name-servers 8.8.8.8; #dns
option subnet-mask 255.255.255.0;
range dynamic-bootp 192.168.245.100 192.168.245.110;
default-lease-time 21600;
max-lease-time 43200;
next-server $next_server;
[root;localhost etc]# cobbler sync
#同步
[root;localhost etc]# cobbler import --path=/mnt/ --name=tangyuxuan arch=x86_64
#生成镜像;没挂载得挂载再使用
[root;localhost etc]# cobbler import --path=/mnt/ --name=tangyuxuan arch=x86_64
task started: 2022-09-25_112949_import
task started (id=Media import, time=Sun Sep 25 11:29:49 2022)
running python triggers from /var/lib/cobbler/triggers/task/import/pre/*
running shell triggers from /var/lib/cobbler/triggers/task/import/pre/*
shell triggers finished successfully
Found a candidate signature: breed=redhat, version=rhel8
Found a matching signature: breed=redhat, version=rhel8
Adding distros from path /var/www/cobbler/distro_mirror/tangyuxuan:
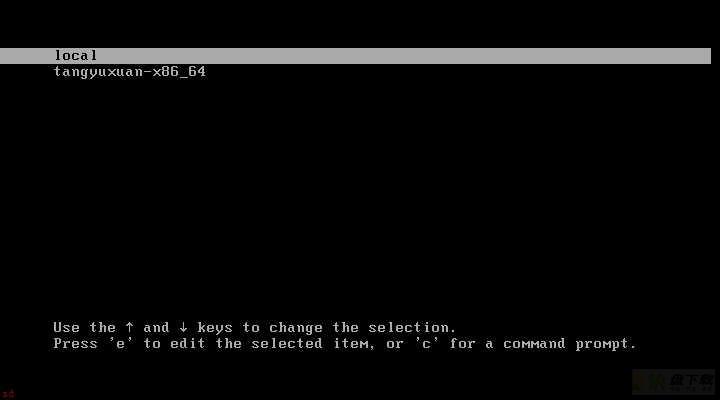
creating new distro: tangyuxuan-x86_64
trying symlink: /var/www/cobbler/distro_mirror/tangyuxuan -> /var/www/cobbler/links/tangyuxuan-x86_64
creating new profile: tangyuxuan-x86_64
associating repos
checking for rsync repo(s)
checking for rhn repo(s)
checking for yum repo(s)
starting descent into /var/www/cobbler/distro_mirror/tangyuxuan for tangyuxuan-x86_64
Processing repo at : /var/www/cobbler/distro_mirror/tangyuxuan/AppStream
need to process repo/comps: /var/www/cobbler/distro_mirror/tangyuxuan/AppStream
looking for /var/www/cobbler/distro_mirror/tangyuxuan/AppStream/repodata/*comps*.xml
Keeping repodata as-is :/var/www/cobbler/distro_mirror/tangyuxuan/AppStream/repodata
processing repo at : /var/www/cobbler/distro_mirror/tangyuxuan/BaseOS
need to process repo/comps: /var/www/cobbler/distro_mirror/tangyuxuan/BaseOS
looking for /var/www/cobbler/distro_mirror/tangyuxuan/BaseOS/repodata/*comps*.xml
Keeping repodata as-is :/var/www/cobbler/distro_mirror/tangyuxuan/BaseOS/repodata
*** TASK COMPLETE ***
[root;localhost etc]# cobbler list
distros:
tangyuxuan-x86_64
profiles:
tangyuxuan-x86_64
systems:
repos:
images:
mgmtclasses:
packages:
files:
[root;localhost etc]#
查看详细信息 查看指定的–name 接镜像名
[root;localhost etc]# cobbler distro report --name=tangyuxuan-x86_64
Name                           : tangyuxuan-x86_64
Architecture                   : x86_64
Automatic Installation Template Metadata : {;tree;: ;http://;;http_server;;/cblr/links/tangyuxuan-x86_64;}
TFTP Boot Files                : {}
Boot loader                    : grub
Breed                          : redhat
Comment                        :
Fetchable Files                : {}
Initrd                         : /var/www/cobbler/distro_mirror/tangyuxuan/images/pxeboot/initrd.img
Kernel                         : /var/www/cobbler/distro_mirror/tangyuxuan/images/pxeboot/vmlinuz
Kernel Options                 : {}
Kernel Options (Post Install)  : {}
Management Classes             : []
OS Version                     : rhel8
Owners                         : [;admin;]
Redhat Management Key          :
Remote Boot Initrd             : ~
Remote Boot Kernel             : ~
Template Files                 : {}
创建kickstarts自动安装脚本
[root;localhost templates]# cobbler profile get-autoinstall --name tangyuxuan-x86_64 > /var/lib/cobbler/templates/centos8.ks
[root;localhost templates]# cd /usr/share/cobbler/bin/
[root;localhost bin]# ls
migrate-data-v2-to-v3.py  migrate-settings.sh  mkgrub.sh  settings-migration-v1-to-v2.sh
[root;localhost bin]# ./mkgrub.sh
[root;localhost bin]# systemctl restart httpd
[root;localhost bin]# systemctl restart cobblerd.service
完成半手动部署
下面使用自动部署


ok了
加载全部内容