用CentOS7 Firewall NAT 及端口映射来实现从外网访问win7的远程桌面
作者:快盘下载 人气:本篇文章转载于互联网,写的非常好,对我有提示和帮助,分享给大家,文章主要涉及虚拟机IP是自动获取的,NAT地址转换和从外网访问win7的远程桌面,三方面的操作。小伙伴们搬好板凳开始了。网络ip地址分配这块,写的有些繁杂了。如果你有网络基础,可以自己搞定。

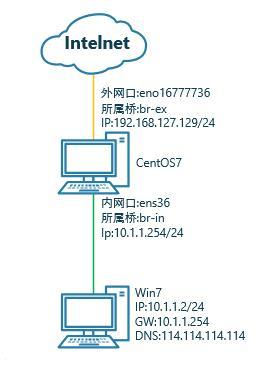
因为我的环境里CentOS7上有KVM虚拟机需要共享网卡上网,所以我把网卡都添加到了桥里面,当然这里也可以不用桥,直接用物理网口;用nmcli创建桥,并添加网口到桥;然后给桥设置IP地址:
以下这个建立网桥的操作,太麻烦了。可以忽略,安装你自己的方式创建网络。无法就是创建两个网络然后将网卡添加到相应的桥中
先创建两个桥"br-ex"和"br-in"
[root@localhost ~]# nmcli con add type bridge con-name br-ex ifname br-ex autoconnect yes
Connection 'br-ex' (2b823432-af25-497a-9b59-8b63709ef8ad) successfully added.
[root@localhost ~]# nmcli con add type bridge con-name br-in ifname br-in autoconnect yes
Connection 'br-in' (e9c07ace-4182-41db-8208-7b93c139842f) successfully added.
[root@localhost ~]# nmcli con show
NAME                UUID                                  TYPE            DEVICE
Wired connection 1  8c368bb5-8050-355f-a513-49b5c4bca3f8  802-3-ethernet  ens36
br-ex               2b823432-af25-497a-9b59-8b63709ef8ad  bridge          br-ex
br-in e9c07ace-4182-41db-8208-7b93c139842f  bridge          br-ineno16777736         01ef745d-f2ee-421a-8dd5-4da36d509e2a  802-3-ethernet  eno16777736
将网卡"ens36"加入到"br-in",将网卡"eno16777736"加入到"br-ex"
这里首先删除nmcli里的connection
[root@localhost ~]# nmcli connection delete eno16777736
Connection 'eno16777736' (01ef745d-f2ee-421a-8dd5-4da36d509e2a) successfully deleted.
[root@localhost ~]# nmcli con delete "Wired connection 1" Connection 'Wired connection 1' (8c368bb5-8050-355f-a513-49b5c4bca3f8) successfully deleted.
[root@localhost ~]#
然后将网卡添加到相应的桥中
[root@localhost ~]# nmcli connection add type bridge-slave con-name eno16777736 ifname eno16777736 autoconnect yes master br-ex
Connection 'eno16777736' (cc6b32bf-4a23-42a1-af6e-85cf93f1686f) successfully added.
[root@localhost ~]# nmcli connection add type bridge-slave con-name ens36 ifname ens36 autoconnect yes master br-inConnection 'ens36' (2b7cf193-22eb-4b61-8887-1aed25b33fd1) successfully added.
[root@localhost ~]# nmcli con show
NAME         UUID                                  TYPE            DEVICE
br-ex        2b823432-af25-497a-9b59-8b63709ef8ad  bridge          br-ex
br-in e9c07ace-4182-41db-8208-7b93c139842f  bridge          br-ineno16777736  cc6b32bf-4a23-42a1-af6e-85cf93f1686f  802-3-ethernet  eno16777736
ens36        2b7cf193-22eb-4b61-8887-1aed25b33fd1  802-3-ethernet  ens36
[root@localhost ~]#
此环境中外网的IP是自动获取的,当然用固定的也是可以的,下边的是重点。
下面要设置NAT了
1、启用IP转发
[root@localhost ~]# echo "net.ipv4.ip_forward = 1" >> /etc/sysctl.conf
[root@localhost ~]# sysctl -p    #使更改立即生效
net.ipv4.ip_forward = 1[root@localhost ~]#
2、在Firewall中将桥放到相应的zone
[root@localhost ~]# firewall-cmd --zone=external --change-interface=br-ex --permanent
The interface is under control of NetworkManager, setting zone to 'external'.
success
[root@localhost ~]# firewall-cmd --zone=internal --change-interface=br-in --permanent
The interface is under control of NetworkManager, setting zone to 'internal'.
success
[root@localhost ~]#firewall-cmd --list-all-zones
3、设置IP地址伪装(让所有内网的流量出去到外网源地址都伪装成br-ex的地址)
[root@localhost ~]# firewall-cmd --zone=external --add-masquerade --permanent
Warning: ALREADY_ENABLED: masquerade
success
[root@localhost ~]# firewall-cmd --zone=external --list-all
external (active)
target: default
icmp-block-inversion: no
interfaces: br-ex
sources:
services: sshports:
protocols:
masquerade: yes
forward-ports:
sourceports:
icmp-blocks:
rich rules:
[root@localhost ~]# firewall-cmd --zone=internal --list-all
internal (active)
target: default
icmp-block-inversion: no
interfaces: br-insources:
services: dhcpv6-client mDNS samba-client sshports:
protocols:
masquerade: no
forward-ports:
sourceports:
icmp-blocks:
rich rules:
4、设置NAT
[root@localhost ~]# firewall-cmd --permanent --direct --passthrough ipv4 -t nat -I POSTROUTING -o br-ex -j MASQUERADE -s 10.1.1.0/24success
[root@localhost ~]# firewall-cmd --reload    #reload Firewall让配置生效
success
5、给"br-in"设置IP地址,这段不用看了。
[root@localhost ~]# nmcli con modify br-in ipv4.addresses 10.1.1.254/24 autoconnect yes ipv4.method manual
[root@localhost ~]# nmcli con up br-inConnection successfully activated (D-Bus active path: /org/freedesktop/NetworkManager/ActiveConnection/50)
[root@localhost ~]# ip a1: lo: <LOOPBACK,UP,LOWER_UP> mtu 65536 qdisc noqueue state UNKNOWN qlen 1link/loopback 00:00:00:00:00:00 brd 00:00:00:00:00:00inet 127.0.0.1/8 scope host lo
valid_lft forever preferred_lft forever
inet6 ::1/128 scope host
valid_lft forever preferred_lft forever2: eno16777736: <BROADCAST,MULTICAST,UP,LOWER_UP> mtu 1500 qdisc pfifo_fast master br-ex state UP qlen 1000link/ether 00:0c:29:07:82:16 brd ff:ff:ff:ff:ff:ff3: ens36: <BROADCAST,MULTICAST,UP,LOWER_UP> mtu 1500 qdisc pfifo_fast master br-in state UP qlen 1000link/ether 00:0c:29:07:82:20 brd ff:ff:ff:ff:ff:ff4: br-ex: <BROADCAST,MULTICAST,UP,LOWER_UP> mtu 1500 qdisc noqueue state UP qlen 1000link/ether 00:0c:29:07:82:16 brd ff:ff:ff:ff:ff:ff
inet 192.168.127.129/24 brd 192.168.127.255 scope global dynamic br-ex
valid_lft 1512sec preferred_lft 1512sec
inet6 fe80::2ab1:e7db:9af:27f/64 scope link
valid_lft forever preferred_lft forever19: br-in: <NO-CARRIER,BROADCAST,MULTICAST,UP> mtu 1500 qdisc noqueue state DOWN qlen 1000link/ether 00:0c:29:07:82:20 brd ff:ff:ff:ff:ff:ff
inet 10.1.1.254/24 brd 10.1.1.255 scope global br-invalid_lft forever preferred_lft forever
[root@localhost ~]#
#这个时候br-in还没有完全UP起来,稍等几秒钟再看
[root@localhost ~]# ip a1: lo: <LOOPBACK,UP,LOWER_UP> mtu 65536 qdisc noqueue state UNKNOWN qlen 1link/loopback 00:00:00:00:00:00 brd 00:00:00:00:00:00inet 127.0.0.1/8 scope host lo
valid_lft forever preferred_lft forever
inet6 ::1/128 scope host
valid_lft forever preferred_lft forever2: eno16777736: <BROADCAST,MULTICAST,UP,LOWER_UP> mtu 1500 qdisc pfifo_fast master br-ex state UP qlen 1000link/ether 00:0c:29:07:82:16 brd ff:ff:ff:ff:ff:ff3: ens36: <BROADCAST,MULTICAST,UP,LOWER_UP> mtu 1500 qdisc pfifo_fast master br-in state UP qlen 1000link/ether 00:0c:29:07:82:20 brd ff:ff:ff:ff:ff:ff4: br-ex: <BROADCAST,MULTICAST,UP,LOWER_UP> mtu 1500 qdisc noqueue state UP qlen 1000link/ether 00:0c:29:07:82:16 brd ff:ff:ff:ff:ff:ff
inet 192.168.127.129/24 brd 192.168.127.255 scope global dynamic br-ex
valid_lft 1435sec preferred_lft 1435sec
inet6 fe80::2ab1:e7db:9af:27f/64 scope link valid_lft forever preferred_lft forever19: br-in: <BROADCAST,MULTICAST,UP,LOWER_UP> mtu 1500 qdisc noqueue state UP qlen 1000link/ether 00:0c:29:07:82:20 brd ff:ff:ff:ff:ff:ff
inet 10.1.1.254/24 brd 10.1.1.255 scope global br-invalid_lft forever preferred_lft forever
inet6 fe80::5bec:cd7f:9ae7:12a5/64 scope link valid_lft forever preferred_lft forever
#可以看到br-in已经UP起来了
6、到win7中测试


这里因为没有在CentOS7里配置DHCP服务,所以win7需要手动配置IP
至此NAT设置完成
7、端口映射
这里从外网访问win7的远程桌面(TCP3389号端口)为例
再外网访问192.168.127.129的3389号端口,Firewall会将流量转给win7(10.1.1.2)
[root@localhost ~]# firewall-cmd --zone=external --add-forward-port=port=3389:proto=tcp:toport=3389:toaddr=10.1.1.2 --permanent
success
[root@localhost ~]# firewall-cmd --reload
success
[root@localhost ~]# firewall-cmd --zone=external --list-forward-ports
port=3389:proto=tcp:toport=3389:toaddr=10.1.1.2[root@localhost ~]#
配置win7的远程桌面后验证

加载全部内容